In astrophotography, any good picture starts with a good polar alignment. Accurately aligning the equatorial mount right ascension axis so that it is in parallel to the earth’s axis is not an easy feat. Available methods, whether manual or software assisted, are time-consuming procedures that in many cases reach only limited accuracy.
This is particularly the case of iterative methods in which, after first adjustment, the subsequent ones take longer and become more difficult. This is why, after battling this problem for years, Daniel Valente and myself (Pedro Sánchez) have devised an alternative method for polar alignment that has proven to be easier, faster to implement and, above all, much more accurate than any of the ones we have ever tried. We have also developed a tool that calculates the current NCP (North Celestial Pole) mount alignment offset and tells you how to correct it.
When using this method, an equatorial mount or an alt-azimuth mount over a wedge is required. Although NCP is mentioned throughout our documents, this method is also suitable for the southern hemisphere, taking into the account the apparent counterclockwise rotation of the stars overhead (diurnal motion). The very first time you align the mount using this approach, a 45-90 minute capture is required (*). From this point on, and regardless of where you go within the same hemisphere and with the same telescope (optical train), polar alignment should be achieved in no more than 15-30 minutes.
Anyone who is looking for a good polar alignment (in order to avoid field rotation during lengthy exposure) will benefit from this method whether they have a fixed or portable setup.
We have searched the Web to find anything related to this idea and found nothing of this kind. So we have taken the liberty to name the method after ourselves: Sánchez -Valente. It might seem pretentious, but since it is unlikely that we will have a chance to make a greater contribution to astronomy, we thought we should take advantage of this one. 🙂
Simply stated, the idea behind our method is to capture two images with the mount in «Park /Home» position, i.e., pointing at NCP (North Celestial Pole). In order to capture both images we must set our mount tracking «off».
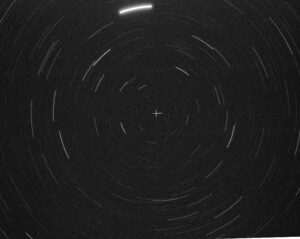
- Image 1: Starting from «Park /Home Position» capture a 2-3 minute image while moving the mount RA towards East.
(To move the mount’s RA axis use the hand control directional keys)
Note: start moving the RA from Park /Home position towards East right before you launch the image capture and keep moving it until the image capture ends. Once captured, you should get the classic star trail image. The rotation center of this image is the sky point your mount is currently pointing at
Ideally, it should be the NCP, although that rarely happens 😉
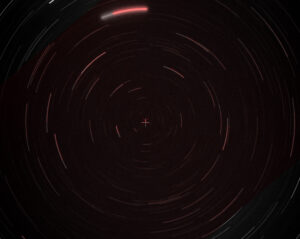
. - Image 2: Go back to Park /Home position and capture a 45-90 minute image without moving the mount (keep the tracking «off» and the mount stopped at Park /Home position). This time the rotation of the starry sky will create the star trails in the picture. The rotation center of this image is the true NCP.
The trick lies in measuring the rotational centers offset. If we can manage this, we could accurately determine the adjustment required for the mount.
Although this is just a quick description of the method and its results, it is not a simple matter of overlapping images and measuring the offset between both centers. At the end of this post you will find a detailed document about the method, a quick guide and the initial prototype tool built in Excel. Some time after that, we developed the SV aligner.
It is a visual tool that fully automates all calculations based on the selection of two star trail segments on both images. Below you will see the results we achieved using our method on an EQ6 Pro mount.
The pictures below are the two captures mentioned above.
When the two pictures are overlapped you can easily see the degree of the mount alignment error. After a few minutes, the path followed by the mount RA axis (in red) drifts away from the real star trail path (in white).
The small red cross in the center of the image shows the RA rotation center while the white one is the true NCP point. According to our calculations, the offset error shown in this image is 73.27 pixels. This represents 3.27 arcmin (based on our telescope focal length and CCD pixel size)
Once the adjustment has been set, we can see that the alignment has improved immensely. The following picture shows the alignment achieved in just one step and on our first try.
This is once again the overlapped pictures of the sky trails with the new RA movement captured after the one-step alignment adjustment.
Now you can see the close proximity of both rotation centers. The current error after one step alignment is only 26 arcsec!!!
Supporting documents at the end of this post go into much greater detail. We also include a quick visual guide for those who want to get started immediately.
The very first time you perform the alignment using our method, you might manage to get excellent polar alignment in about 1.5-2 hours. If you save the «Sky Mov.» image, following polar alignments with SV aligner, whenever you are within the same hemisphere and using the same optical train (**), all this should take no more than 15-30 minutes.
That is the trick to this method.
Notes:
*, **: In fact, there is no need to capture the long image 1,5 – 2h «Sky Mov.»
Any starry sky rotation image around polaris area will work, however, when using a «Sky Mov» image taken at different focal length and/or image resolution, you must take into the account the scale factor parameter shown in SV aligner.
To learn more about the scale factor check the «Annex 6: scale factor» in the SV aligner quick guide.
SV aligner
Polar alignment tool based on the Sánchez – Valente method.
SV aligner, the perfect alignment.
Supporting documents
FAQ
Abstract (in Spanish)
Initial prototype build in Excel.
This was the initial prototype developed to test our method.
Weeks later we developed the SV aligner. However, these documents show the initial steps we followed to put our idea into practice.


